
This is Part 3 of this Rhino 3D Organic Styling detail tutorial.
Note: This video shown below is an update of this styling detail’s concept modelling using Rhino Version 6
>>> Click here to go to Part 1 of this tutorial.
>>> Click here to go back to Part 2 of this tutorial.
In Part 2, we have matched the 2 surfaces as shown below.

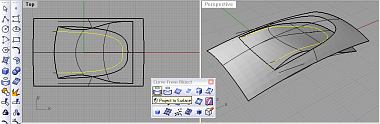
Next, we need to project the newest curve onto the newly matched surface. The Curve-on-surface (COS) should be created as shown below,
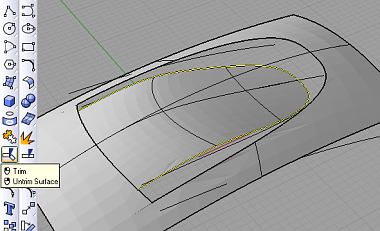
Next, Trim off the excess portion of the 2nd surface as shown below. As described earlier, for the newer versions of Rhino, it is not necessary to create a curve-on-surface in order to execute a trim.
Now, we need to create a nicely blended surface between the gap formed by the 2 surfaces. To do that go to Surface Tools >> Blend Surface. Select the 2 edges to create the new blend surface as shown below.

We have come to the end of Part 3 of this Rhino 3D styling tutorial.
>>> Click here to go to part 4.
Part 4 will be the final part of this tutorial.
To purchase Rhinoceros Surfacing Techniques Book via Amazon, click on book cover image below.

Note: This Rhino 3D tutorial is not included in the book.