
This is a Rhinoceros 3D modeling tutorial pertaining mainly to product and industrial design.
In Alias Studio, there is a very powerful tool for controlling and manipulating the tangency of a curve to an adjacent curve or surface edge known as the Project Tangent. Below is a screenshot from AliasStudio PLE that illustrates this useful tool.

As of this writing, I can’t find a similar tool in Rhino 3D. Perhaps, I am not looking hard enough, ha ha.
Despite the lack of Project Tangent in Rhino, the same outcome is still achievable using Rhino. I use a work-around that can more or less produce a similar result. The steps will be illustrated below.
Firstly in Rhino, using Match Curve, match the curve to the edge of the surface that it needs to be tangent to.

Rhino will prompt you to select the required Continuity quality (as shown below). For this example, Tangent for continuity was used. For an even smoother outcome, you should use Curvature.

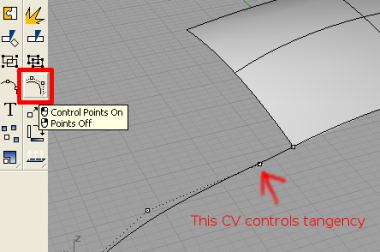
Now, activate Control Points On for the curve. We will want to see the CVs.
An important information to know is that the 2nd CV of the curve controls the Tangency. The 2nd CV is actually tangent to the end edge of the Surface. The screenshot below gives a clearer picture.
This is the end of Part 1.
One thought on “Rhino 3D: Manipulating tangent curve (Part 1)”
Comments are closed.