
In this part of this Blender 3D tutorial, we will describe the nodes configuration in greater details.
>>> Click here to go back to Part 1
>>> Click here to go back to Part 2
>>> Click here for details on Product Rendering Course in Singapore
In the Nodes Editor, click on Composite Nodes and Use Nodes to activate them.
By default, one input render layer and one output will appear in the Nodes window.
We need to add one additional Render Layer. To do so, go to Add >> Input >> Render Layers (as shown below).

Next we need to set the 2 Input layers to ‘Glows‘ and ‘Base‘ respectively. To do that, click on the up-down button of each Input node (as shown below).

In order to create the glowing effect from the ‘Glows’ render layer input, we need to firstly blur it, followed by brightening the glow intensity.
To do that, firstly, add a Blur filter. To do so, go to Add >> Filter >> Blur. Give values of X and Y greater than zero. The greater the value, the bigger the glow size. As for Blurring mode, my preference is Gaussian (Gauss).
Next, add a RGB Curve using Add >> Color >> RGB Curves. By default, the curve is an angled straight line. As in Photoshop, insert a knot and changing the curve shape will correspondingly change the RGB value. To get a brighter glow, pull the knot upwards.
Now, we need to find a way to integrate the glows onto the rest of the rendering. To do that, add a Mix node using Add >> Color >> Mix. Note: In this node, use the Add mode. Factor set to about 1.oo.
Now, configure and connect the nodes as shown below:
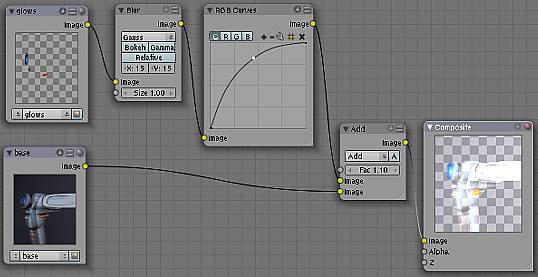
The sequence should be as such:
Connection 1: ‘Glows‘ input render layer connects to Blur filter. Blur filter connects to RGB Curve. RGB Curve connects to the Add mix node.
Connection 2: ‘Base‘ input render layer connects to the lower image input of Add mix node.
Connection 3: Add node connects to Output Composite.
Once all this is done, go to the Scene(F10) Panel. Turn on Do Composite. Click the Render button.
If everything goes well, you should see the nice glows in the final rendering as shown below.

That’s all for this Blender 3D tutorial. Thanks for reading 🙂
Thanks for the tute. It helped a lot !
Hi Greg,
You are welcome 🙂
Thanks for the tut!
Just a question: it looks there’s no mention about the light setup. Shouldn’t the light be set up to be visible on both layers (from the Draw panel)?
Hi Marco,
Thanks for pointing that out.
I will edit the tutorial to include that point. 🙂
Hi,
Great tutorial. In Blender 2.48a, I set up a simple scene exactly as described an in the Nodes window, the Composite node shows the glow effect just as it should be. However, when I Render, and yes the “DO COMPOSITE” button is enabled, I do not get the glow effect in the final render.
Yes, in the Glow layer, the “Sky” button is disabled.
Any clue?
Hi Grima,
I have no idea… But i hope someone reading this can offer some help…
Grima,
have you tried moving the light so that it is illuminating the part of the object you are trying to glow? That was the main thing that i did wrong. Hope this helps or atleast that you read this . . .
Hey man this is a great tutorial and it really work, but i have one problem, if i make a sphere glow and i put a box in front of the glowing sphere, the glowing effect goes through the box, so basicly is that the glowing efect goes on top of everything.
can you help me whit this?
oops sorry man for the last comment, i am using blender 2.5 and the control click part on the layer dont work so i now discover that using the zmask button do the same effect lol
Holy moly that is fantastic, I really enjoyed making items in my scene glow, all thanks to you mr.
I too get a great glow, but the glow covers everything. And toggling the mask on/off in the glow layer doesn’t seem to make a difference.
It now works beautifully. But I had to engage the “AllZ” button in my glow layer.
Thanks for the great tute!
@Grima
Maybe you didn’t check the Use Node at bottom of node editor.
I dont think its that and its nearly a year you asked this question, but who knows maybe can help someone.
This was pretty helpful- I was stumbling figuring this out myself, but this helps me cut to the chase and know what I am doing.
However, I have a crazed imagination so I was wondering if there was a way to create an object that was excluded from the light effects form other layers but its own? and if the light from that object can still be made to effect the objects from the other layers? Kind of like a ghost with light passing through it, but it can still emit a glow that effects other objects. (Although I am look at more like the light that is on the ghost can still touch all other objects; with a light switch). From there I will figure out how to pick and choose what is and isn’t effected.
I am thinking that I will need the same object in two layers that are joined to move at the same time in the same way.