
Sometimes in a 3D rendering, there are objects and parts that will need to glow. If you are doing product rendering and visualisation, sometimes LCDs, lenses and buttons can look more realistic and attractive with a soft glow.
This Blender 3D tutorial talks about using composite nodes to make certain objects in a scene glow.
The example below makes a comparision between a rendering with glow and one without. The rendering on the right show the lenses and button of the Videocam glowing.

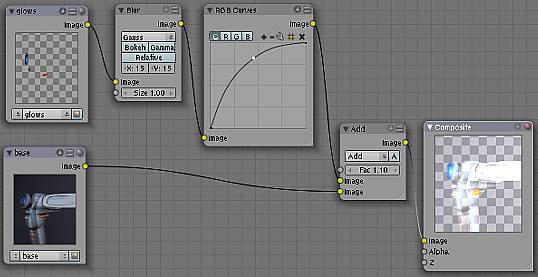
The general process for creating the glows is outlined below:
1. Create 2 different render layers:
A. One layer for all the glowing objects and lights. We can call this the ‘Glows Layer’.
B. Another layer for the general scene with every thing included. This layer must include the glowing objects and lights too. We can call this the ‘Base Layer’.
2. Using Blur filter to soften and diffuse the Glows Layer.
3. Use RGB Curve to control glow intensity of the Glows Layer.
4. Composite the 2 layers as a single rendering.
The Node Configuration is shown below:
This is the end of part 1 of this Blender 3D Tutorial. In Part 2, we will talk about the steps in detail.