
Note: This tutorial pertains to the old Yafray. For good documentation of the Yafaray Renderer, you may want to download Yafaray-Blender PDF Ebook.
For this tutorial, you will need to know how to use Blender 3D, a 3D modeling, rendering and animation software. If you are unfamiliar with the basics of Blender 3D, click here for introductory resources on this software.
Yafray is a free high quality raytracer. It is capable of producing photo-realistic renderings. For rendering of product and industrial design concepts, it is quite good for churning out photo-real outputs. The principle of product rendering is somewhat similar to that of product photography.
I use Yafray via Blender 3D. Installation of Yafray is quite straightforward. Simply download it from its main site at yafray.org and run the installation file.
To follow this tutorial, you will need to have Blender 3D installed on your computer as well.
With Yafray, lighting a scene is as per Global Illumination styled. Unlike non-GI enabled raytracers, lighting may not necessarily come from light sources such as spotlights, sun lights. Instead, the lightsource can come from the surrounding and light-emitting objects within the scene. That means, with Yafray, you need not add conventional light sources (such as spot light) into the scene.
This article describes the usual method of how I go about creating a Product Rendering using Yafray as the rendering engine.
Specifying objects as light sources
You can use objects as light sources. I usually use Mesh planes as light emitters. To make the object emit light, in the Material Panel, give Emit a value greater than zero. Note: when using Yafray, Blender’s area light is regarded as a light emitter instead of it being a conventional light type.
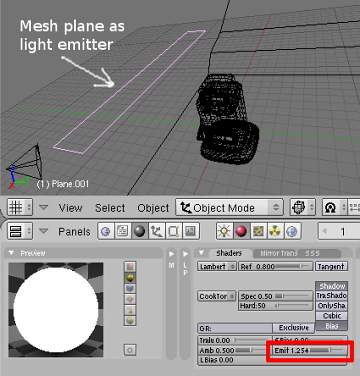
The higher the emit value, the brighter the light source. You can also change the colour of the light by changing the Col value of the object. Typically, I keep it white or grey.
Adding an Environment Map
Typically, I will add an Image as an environment map. The purpose of doing this is to create reflections on reflective surfaces. This will create more added details and interests to the rendering. I often use Jpeg as the image map. However, you can also use a Hdr file. To add the image into the World, go to the Texture Panel. Select World. Select Image from the Texture Type panel. Next, browse to the location of the Jpeg image. For a better picture, see the screenshot below.
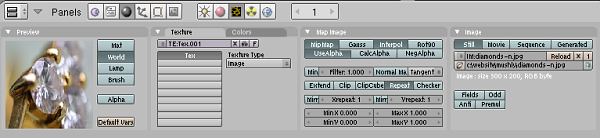
Now, we need to ensure that the Image is appearing in the world. Go to the World Panel. Click the four buttons Blend, Hori, ZenUp and Zendown from the Map To section. This will enable the map to be seen on the Preview window.

If you are using Hdri light probe files, please select AngMap (Angular Map) from the Texture and Input panel. Under the Preview section, select Real. Under Map To, select Hori. Hdr files are High Dynamic Range image files that are capable of helping in creating very realistic reflections. To get free HDR maps, click here.
Rendering the scene
To render the scene, we will need to go to the Render Panel. Make sure Shadow, Ray, EnvMap are enabled. Under the big Render button, select Yafray as the Rendering Engine.
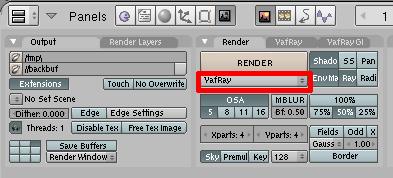
Now, we need to specify the settings for Yafray. Go to the Vafray GI panel. Under Method, select either Full or Skydome. Specify the Quality of the render.
Where necessary change the value of the EmitPwr. This value controls the intensity (brightness) of the light source emitters. Where necessary change the value of the GI Pwr. This controls the energy intensity of the emitter. To brighten or darken the scene, the easiest way is to tweak the GI Pwr value. Cache on will speed up the rendering process.

Some Rendering Results
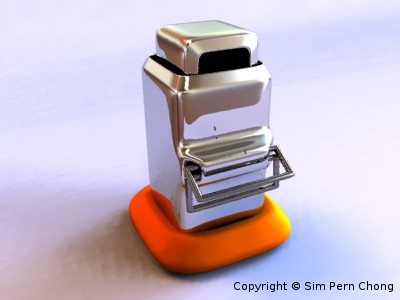
Rendering 1 (directly below) is a Yafray rendering that uses the following setting:
- a mesh plane as an emitter
- a jpeg image as an environmental map
 Rendering 1
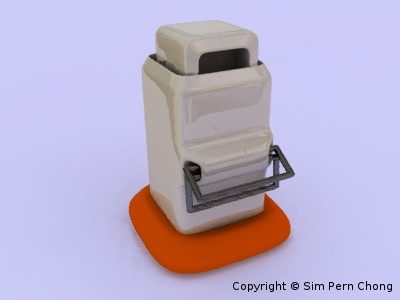
Rendering 2 (shown directly below) employed the following configuration:
- a mesh plane as a light emitter
- a Hdri image file as an environment map
 Rendering 2
As mentioned earlier, Yafray rendering may not necessarily include any light elements. Rendering 3 (below) is done without adding any preassigned light sources and light emitting objects.
 Rendering 3
As you can see, the first 2 renderings which have the added light emitter produced better contrasts. Also, the Hdri enabled rendering (Rendering 2) has more tonal variation and details than Rendering 1 which used Jpeg as an environmental map.
For added realism, you may also want to consider creating a Depth of Field (DOF) for the rendering. This will allow the important portion of the rendering to stay in focus, while the rest are more of less defocussed.
>>> Click here to learn how to create Depth of Field for Blender 3D – Yafray.
That’s the end of this tutorial on using Yafray for Product Rendering. I hope that it has been useful. 🙂
Thanks for the tutorials Sim. They are much appreciated. I’ve been delaying getting to grips with YafRay for too long.
I’m not sure that having an emitter object in my scene actually made any difference to the final render. Maybe I’m doing something wrong.
Hi Jon,
You are most welcome 🙂
I think the emitter works mainly for highly reflective surfaces. I usually bring the emitter close to the reflective surface to bring out the highlights.
regards
why is it that particles doesn’t appear in yafray?
I’m getting a black render. I don’t have Open GL, using XP is that necessary?
Hi Joel,
I don’t think Open GL is the problem.
Did you install Yafray properly?
As a side note, Yafray is not the same as Yafaray.
regards
First at all thank you so much to gave a better start for Yafray. But unfortunately when I hit F12 the rendered output was totally black. So I’m so disappointed. Can you guess what I did wrong?
I’m using Blender2.47 and Yafray new version few days ago downloaded.
Hi Rockermg,
The Yafray new version is actually Yafaray. It is a totally different program. For Yafaray, you go to run it from Render>>>Yafray export.
Also Yafaray need to assign materials separately, from its own panel.
Personally, I am not a great fan of Yafaray…
Hey again. It seems Yaf(a)ray is not working in my Blender application properly. My operating system is Windows Vista Business service pack 1. Is it support to Yaf(a)ray?
Everytime I tried to render with Yaf(a)ray a black window came as a result. And the massage also appeared in the Blender black text window as I mentioned below.
No export directory set in user defaults!
Will try TEMP instead: C:\Users\MyName\AppData\Local\Temp
Couldn’t FIND registry key for yafray,is it installed?
Please, I want to know the way of fixing this problem. Anyway I never knew about a registry key for Yaf(a)ray. Where I can find it.
I appreciate if someone give me a sufficient solution for my case.
Thank you
Hi Rockermg,
I am so sorry that I couldn’t really help you on that as I am not a Yaf(a)ray user.
Perhaps, you should try the Blender artist forum at http://blenderartists.org/forum/index.php
There are quite a few pros there.
Also, try the forum at yafray.org too.
Sorry about that, pal..
Thank you for your responsibility.But all the options are there same in Yaf(a)ray also as you explained in your tutorial. Anyway can you tell me where I can find old version of Yaf(a)ray.
Hi,
Thanks for the tutorials Sim, i am amateur in Yafaray.
Is possible to have Product Rendering using Yafray via Blender 3D
with Blender 2.6x and yafray 0.12?
best regards
Hi Serviteur,
I may do that when time allows.
Best regards