
This tutorial is meant for beginners to Kerkythea rendering system.
First off, I will like to emphasize that I am no expert in Kerkythea. In this tutorial, I am merely describing what works for me. 🙂 Also, because I am an Industrial Designer, the tutorial is geared towards setting up the environment for Product Rendering. However, the methods should be applicable to other types of rendering projects as well.
The settings and techniques used in this tutorial was used to produce the Product Rendering shown directly below.

Installing Additional Libraries
Before we start to use Kerkythea, I highly recommend that the additional material and global setting libraries be installed.
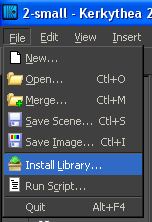
To install the additional libraries, we do not need to unzip the downloaded files. Instead, go to File >> Install library and load the zipped libraries. That’s all that is required.
Once that libraries are installed, they can be accessed every time you use the software. New materials will be seen when we use the apply material functions. As for the Global studios, you can access them from Insert >> Globals ( as shown below).

This is the end of Part 1 of this Kerkythea Tutorial.
Really great job!!!
An easy to use guide: I’m new to render.. and I try it for weeks!!
Your guide was a great help for me!!
THANKS!
You are welcome 🙂