
For Product and Industrial Design Rendering, sometimes we need to simulate the glows emitting from screens and luminating details. This will make for more appealing and stylised renderings.
Below is an image of a product rendering without glow.

Below is the same rendering that includes the glow effect.

There are multiple ways of achieving this effect. One way of creating these Glows within Blender 3D is to use the Compositing Nodes. These nodes work somewhat like layers in Image editors such as GIMP and Photoshop. The advantage of Blender’s nodes over the external graphic editors is that they allow the Blender artist to modify and tweak the results in an interactive and non-distructive manner. Also, unlike the 2D image editors, the effect can be implemented in animations as well.
For this tutorial, it is assumed that you already know how to use Nodes within Blender 3D.
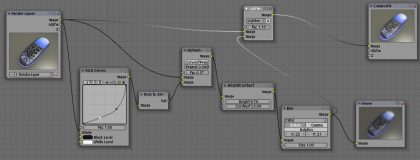
The screenshot shown below is the Compositing Node configuration for achieving the desired glow effects. Click on it to go to a larger display of it.
This is the end of Part 1.
In Part 2, we will look at the process in a more detailed manner.