
Note: This is an old tutorial pertaining to the now-obsoleted Blender 2.4X. Studiorola now conducts a Product CAD Rendering Course using Blender / Cycles Render.
As Blender’s own internal rendering engine improves, it is possible to produce nice photo realistic renderings without the reliance on external GI renderers. The good thing about using Blender’s internal renderer as opposed to an external renderer is that all the new features can be used too, if the need arises. External renderers may not be able to work with some of Blender’s features such as nodes, subsurface scattering and blurry reflections.
One way of producing fast photo realistic renderings is to use HDR together with Ambient Occlusion in Approximate mode.
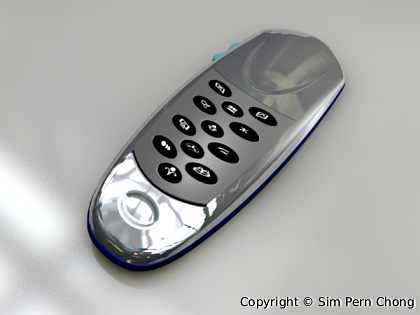
The image below at the original resolution of 800 x 600 took less then 3 minutes to render.
The HDR file should be loaded into the World as an Image Texture, as shown below. For a more detailed description on further settings pertaining to this, please refer to the previous article here.

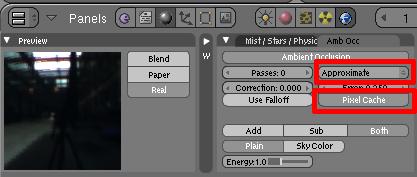
As for the Ambient Occlusion Setting under World, set Gather Method as Approximate. Turn on Pixel Cache. The ambient occlusion is used here to create the fake nice soft shadows. Because of this, if there are any other light sources in the scene, the shadow mode can be turn off for these lights. This will also help to further decrease the rendering duration. As for when to use Add or Both for the ambient occlusion setting, it is a matter of visually assessing the test renders. Typically, using Both will create darker shadows and increase the contrast of the rendered scene.
The settings for Ambient Occlusion are as shown below.
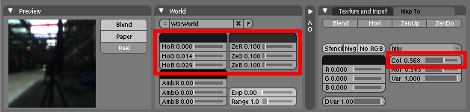
Your first render may turn out either too bright or too dark in certain areas. A quick way to easily ‘correct’ the exposure is to decrease or increase the Col value under Map To of the World Panel. Before we do that, the colours for Horizon and/or Zenith should also be darkened as well. The steps are as shown in the screenshot below.
Although it is possible to illuminate a scene with only a HDR environmental map and Ambient Occlusion, adding one or two spot lights (into the scene) allows one to illuminate specific areas of it. This also enables the designer to control, emphasize and focus the attention of the rendering to where it is required. However, as mentioned earlier, my typical practice is to turn shadow off for these lights and simply allow Ambient Occlusion to provide the nicely diffused shadows.
That’s it! As you can see, it is fairly easy to create nice and fast renderings using only Blender’s internal renderer. If you are in a rush to complete the project under a tight deadline, you can consider trying this method.
Below is a product animation demo that was created using the above-mentioned rendering techniques. The entire animation was rendered in only a couple of hours.
Product Animation using Blender 3D from Studiorola on Vimeo.
Hope that the information provided here is useful to you. 🙂
One thought on “Blender 3D: Fast Product Rendering”
Comments are closed.