
This is Part 2 of this Rhino 3D Product modeling tutorial. This is a tutorial of relevance to product and industrial design type of 3D modelling.
Click here to go back to Part 1
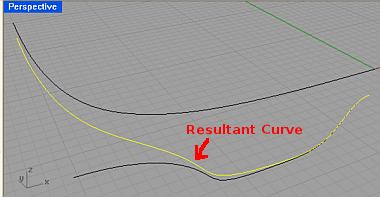
In Part 1, we have already created the resultant curve from the Top and Front profile curves using Curve from 2 Views. The curve is as shown below. For this tutorial, we will use the Top Profile curve as the top edge of one half of the spectacle.
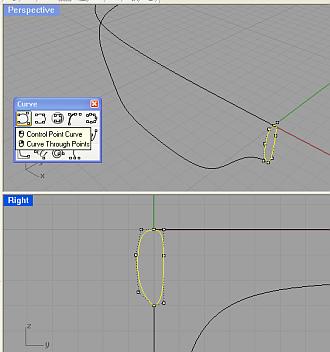
Now, we need to create the cross-sectional curves. In the Right View, create the first Cross-sectional curve using Control Point Curve. Make sure that the 2 points of the curve are touching the ends of the 2 generation curves. If needed, use Osnap End to ensure that. The curve should be similar to what is being shown below.
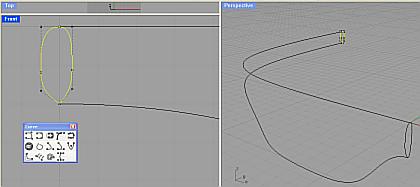
Next, create the other cross-section curve. In the Front View, create the Curve (as shown below) using Control Point Curve.
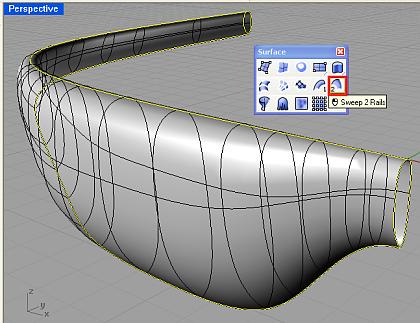
Now, we can create the surface for this half of the model. Depending on the situation, there are several surface tools that can be used. These tools are as of the following:
1. Surface from Network of Curve
2. Sweep 1 Rail
3. Sweep 2 Rail
For our case here, the most appropriate tool is Sweep 2 Rail. Surface from Network of Curve surface tool may not work because of the 2 closed looped curves. Sweep 1 Rail is not suitable because, there are obviously 2 ‘railable’ curves. The Alias StudioTools equivalent of Sweep 2 Rail and Sweep 1 Rail is Rail Surface.
Using Sweep 2 Rail, create the surface using the Rail Curves and Cross-sections as indicated in the screenshot directly below.
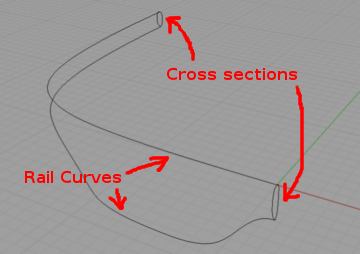
The resultant surface should look like what is being shown below.
This is the end of Part 2 of this Rhino 3D modeling tutorial.
Questions:
1. When making the two cross-section curves with ‘control point curve’, how are you keeping the curves touching the ends of the ‘generation curves’? The only way I know how is to make two separate curves for each side, then join them…is there a better way? I tried ‘curve – interpolate points’, but it doesn’t stay on the generation curve ends with any editing; curve by handles is awkward but workable…any suggestions?
2. After making 4 cross-section curves and joining the pairs, when I try ‘sweep 2’, picking the two rails, then two joined cross-section curve pairs, I get ‘Sweep2 failed to make a surface’. Is this because each cross-section curve is actually two joined curves? When I try single curves (not joined, from ‘handles’) for the cross-section curves, I also get ‘sweep2 failed to make a surface’; when I try only choosing one of the cross-sections, I get the same thing. Flipping which curves are ‘rail’ and ‘cross-section’ make a surface, but not the one we want…and drawing un-joined pairs fails with ‘Unable to sweep – Two shapes are too close together’…any advice?
Ok, here’s a work around:
If I loft the two generation curves, then dupedge, and use these as the rails (with handle curves closed on both ends) it works. Would love it if I knew why I had to do that extra step – which changed the curves anyway (without ‘do not simplify’ checked’; but the precision doesn’t matter at this point…)