
This is Part 3 of this Rhino 3D modeling tutorial. This is an article of relevance to product and industrial design CAID modelling.
Click here to go back to Part 1
Click here to go back to Part 2
Click here to go Advanced Rhino 3D Modelling Course
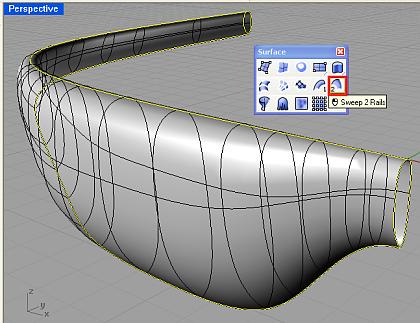
In Part 2, we have already created one half of the model as shown below.
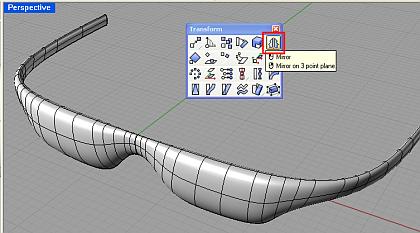
Now, we need to create the other half. We do this by using Mirror. Go to Transform >>> Mirror. Select the surface. Using Osnap End and F8 (Ortho) key, create the other half of the spectacle.
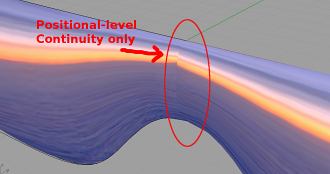
The 2 halves appear to have nicely blended, but they are not. This is because the edge where the 2 halves meet is currently only at Positional-level Continuity. At this continuity level, the 2 surfaces will not appear seamless. We need to ensure at least Tangent-level Continuity for that edge, otherwise for actual production and manufacturing, the part may show an unacceptable line where the 2 halves meet.
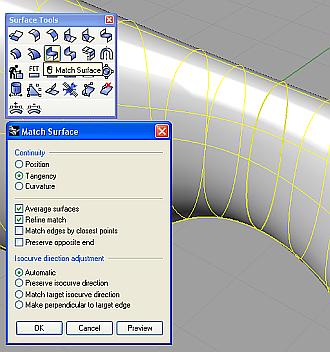
To resolve that, we can use Match Surface to modify the continuity to Tangency-level.
To do that, go to Surface Tools >>> Match Surface. When prompted, select the 2 adjacent edges of the 2 halves. From the Match Surface dialog box, select Tangency or Curvature (depending on your continuity requirement). Next select, Average Surfaces and Refine Match. The adjacent border of the surfaces should be tangent to each other now.
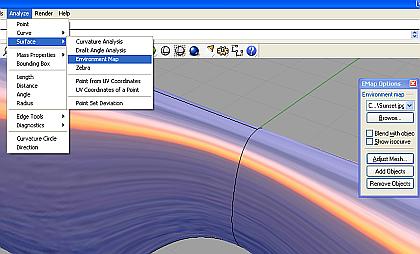
After this, one should evaluate the surface continuity. There are several ways to do this. The common way is to use the Environmental Map or Zebra to visually assess the smoothness and continuity. To evaluate visually using Environment map, select the surfaces, go to Analyze>>> Environmental Map. It is as illustrated below.
That is all for the tutorial. As mention earlier, this method of using Curve from 2 Views with Match surface can be applied for symmetrical modeling of products of other forms as well.
The same method can also be applied to Alias or Autodesk StudioTools. However, in the case of StudioTools, one can simply select Implied Tangent (for the adjacent border) when using Rail Surface and need not go through an additional surface matching process.
To purchase Rhinoceros Surfacing Techniques Book via Amazon, click on book cover image below.

Note: The above video tutorial is not included in the book.
Hello gerald! I’m Zhenhao! remember me not! 🙂
Your student! batch 18!
Damn shocking to find your blog here!
hahaha
Hi Zhenhao,
Ha ha… Small world hor…
heh heh…
Hi there. Why not use Symmetry instead of Mirror+MatchSurface, which was the Rhino 3.0 way of doing things? – I like your tutorial anyway, but personaly I find the Symmetry WithHistoryEnabled much nicer, since you can actually change all the shapes, while actively seeing the result “live” (without deleting and starting over). That was the reason why McNeel introduced “Symmetry” anyway. Kind regards and respect. Tim Elkær
Hi Tim,
This tutorial is written to be compatible with older versions of Rhino 3D including version 1.
Regards and thanks.
Sim