
This is Part 2 of this Rhino 3D tutorial on creating a styling detail.
Note: This video shown below is an update of the detail concept modelling using Rhino Version 6
>>> Click here to go back to Part 1 of the tutorial.
In Part 1, we have trimmed the portion as shown below. You may also wish to hide the curves as they will no longer be used. This will also simplify the scene.
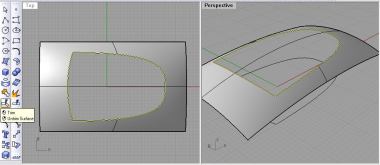
Now,we need to build 3 curves as shown below. The 3 curves should be approximately occupying the trimmed off portion of the surface.

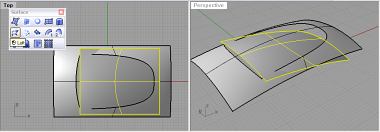
From the 3 curves, build a surface using Loft as shown below.
Next, create a curve that is on the inner edge of the first longer curve. It is important that the curve extends beyond the edge of the first shorter curve. See the pic below.

Now, we need to use Match Surface to match the 2 surfaces. To do that, go to Surface Tools >> Match Surface. Select Edge 1 on the 2nd surface as the edge to change. Next select Edge 2 as the edge to match.
An option box will open up. For Continuity select Curvature.

You should be getting something as shown below.

This is the end of Part 2 of this Rhino 3D styling tutorial.