
To be able to follow this article, one will need to have a basic understanding of how to use Blender 3D, the powerful and amazing open source 3D modelling, animation and rendering application.
What is Cycles Render? It is an open source rendering engine that can produce high quality and photorealistic results. It is fully integrated with Blender 3D.
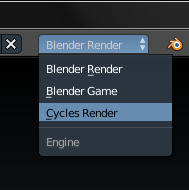
If you have a version of Blender 3D with Cycles installed, Cycle’s functionality can be accessed by selecting it at the Render option (as shown below).
Once the Cycles Render option is selected, parts of Blender User Interface will change to reflect integration with this render engine. When Cycles is selected as the renderer, there are some notable differences in the various options from the default internal render. These changes are mainly reflected in the follow sections of the properties windows panel:
Render Panel : Use for setting rendering options for images and animation
World Panel : Controls for scene background.
Materials Panel: For creating and editing object shaders and materials
Textures Panel: How the objects surface looks.
Enabling GPU computing
Cycles can take advantage of modern graphics cards or GPU (graphics processing unit) to do the rendering. With a modern graphics card used, the rendering speed can be very dramatically improved. Some GPUs can be many many times faster than CPU when it comes to 3D rendering. To have the power to harness the GPU for rendering, supported graphics card must be installed. Below picture shows a GTX gaming card installed on a desktop PC. Blender / Cycles can make use of this card to do its rendering calculation.

Cycles has two GPU rendering modes,
1. CUDA, which is the preferred method for NVidia graphics cards such as the GTX series cards.
2. OpenCL, which is intended to support rendering on AMD/ATI graphics cards.
To enable GPU computing, go to File >> User Preference >> System Tab
Under Compute Device, select available options. Cycles will detect compatible graphics card on your computer and display options accordingly.
Select the intended GPU rendering mode, followed by the appropriate graphic card from the displayed list. This is as illustrated in the screenshot below.

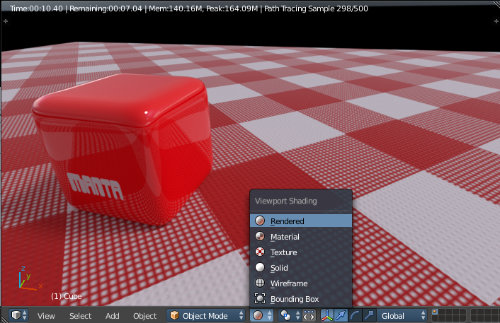
Realistic realtime preview in 3D Window
One of the advantage of using Cycles is that it allows for Realistic realtime preview in the 3D Window. To do that, in the 3D window, set Viewport Shading to Rendered. This is as shown below.
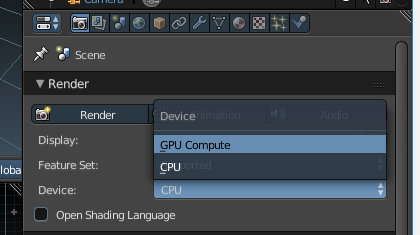
Ok, there are 2 more things to do. At the Properties >> Render Tab, set the Device to GPU Compute.
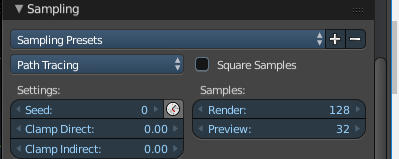
At the Sampling Tab, Render Samples denotes the number of samples that will be used to do the final rendering. The Preview Samples denotes the number of samples that will be used to render the 3D window scene if the Render Mode is set to Rendered.
If your GPU is a powerful one, you will immediately see a dramatic reduction of the time needed to finish rendering the Preview in the 3D window.
That is all. Hope that it is helpful to you.
Thanks for educating