
This is Part 3 which is the final part of the Kerkythea DoF tutorial.
Click here to go back to Part 1.
Click here to go back to Part 2.
In the previous part, we have already created the necessary duplicate layer and layer mask.
Now, in the Layer Dialog, click on the background layer to highlight it. Now we need to blur the layer. To do that, go to Filters >> Blur >> Gaussian Blur ( as shown below).
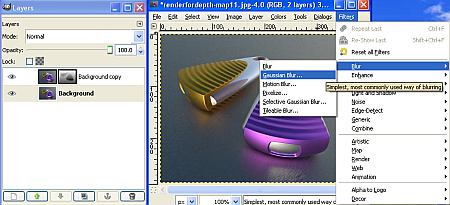
Adjust the Gaussian value until you are happy. You will notice that the layer mask on the duplicate layer controls which portion on the image remains sharp and to what degree.
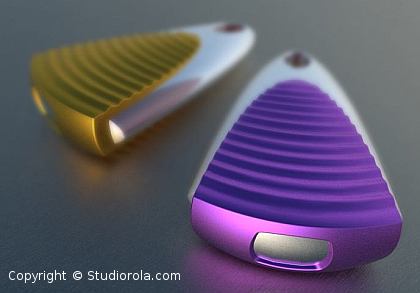
That’s it! You have created the Depth of Field effect. The effect should be as shown below. You can alway go back to the layer mask to manipulate the brightness/contrast. This will change the strength of the DoF.
That’s all for this Kerkythea DoF tutorial. Thanks for reading 🙂
Super! I never knew gimp can do dof. I ws using a plugin for photoshop or blender. Nice tutorial.
Thank you for a straightforward easy to get tutorial. I would like to add that by editing the layer mask with the “Adjust Color Curves” tool you can easily move the DoF through the entire depth of the image. Turn on edit layer, turn off show layer and you can use the curves tool while watching the effect on the composite image.
Thanks a lot, it make renders more dynamic and realistic. It is a bit complicate to adjust perfectly the blur effect elsewhere than the depth map by default but it’s worth it.
This comment is more than a bit off topic. What I don’t get is how to install depthmap into gimp. I’ve looked at several tutorials. They appear to be for advanced user. You guessed it, I’m a newbie. That is how I found out about Kerkythea. Which I would like to learn. If the other tutorials are like this one, well that would be great. But as great as your tutorial is, it is outside my ability to achieve just becuz I can’t get the depthmap plugin to work in gimp. Can anyone direct me to a fully ready depthmap plug in that I can just drop into the plug in folder in gimp?